I'm feeling extra helpful today, so let me help you out with my 'top tips/how to' list as follows:
1. Make sure you have a cake already baked the day/week/month before (freezers are fabulous inventions you know).
2. Do NOT, under any circumstances, let yourself be helped by two children under the age of 8.
What? OK, sorry, scrap that. What I really meant to say of course, is that it's a great way to pass a couple of hours* on a grey and cloudy day in summer.
(*there's some chill time in that - for the cake balls, not the children. Although it works equally well both ways I found).
2. Line a baking tray with greaseproof paper. Make sure it is not too big to go into your fridge, and that you have space ready for it.
3. Crumble your cake into a large bowl (we were using a Madeira cake recipe, which probably works well as the cake is a bit heavier so less 'fluffy' and easier to mould).
4. Add a good dollop of buttercream icing to the crumbled cake and stir well. You'll need to get your hands into the bowl and all sticky to make sure it all packs tightly enough. The girls seemed ever so slightly disturbed that there was more cake mix sticking to their fingers initially than there was left in the bowl, but we discovered that the more you squeeze and mould, the cleaner your fingers get!
5. Pull off small chunks of the mix and roll them in your hands to form small balls. I'd say to aim for roughly 3 cm in diameter, but don't be upset when you (or your helpers) end up with a variety of sizes and shapes which could make up either a snowman's head or lumpy body. Put the balls on the baking tray after you shape each one.
6. Place the balls to chill in the fridge for a couple of hours. To be fair, if you have very impatient children, we found one hour works just as well...
7. Prepare some mini bowls with decorations - anything small and lightweight is preferable. Also good to snack on during chill time.
8. Once you start to feel sick, take the time to prepare your holding block. As in, a place to stand the cake pops in once they are covered in chocolate. This avoids the need to wave them in the air to dry. All the evidence would suggest that a block of polystyrene, or even maybe oasis, would be good for this task. Could I find any of that for sale in the shops? Nope, of course not. So I improvised. Take a couple of old shoe boxes (best if they're empty I'd say) and check they will fit in your fridge afterwards. Then punch holes in the lid with your lolly sticks*, and hey presto! you have a Cake Pops stand.
9. Melt the chocolate covering of your choice in a fairly deep bowl (microwaves are amazing inventions you know). For some reason our white chocolate dissolved to exactly the right consistency, whereas the orange chocolate buttons (fancy) we wanted to use up seemed to turn into a lumpy stodgy mess.
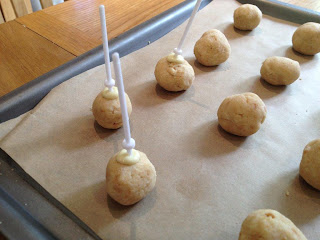
 10. Take a *stick (no, not from the garden) and dip it into the melted chocolate, then into the middle of a ball on the tray and leave it there to set as you do the same with the other balls. (I used reusable white cake pops sticks purchased from Dunelm but am sure lolly sticks would work too if in proportion to the ball size).
 11. Starting back at the beginning of your balls (!), pick the stick up and dip the whole ball in the melted chocolate, upside down. If your bowl is not quite deep enough (weren't you listening properly?!) then it is perfectly acceptable to use a spoon to dribble the chocolate over the bottom of the ball, up to the stick. Hold the ball back up at an angle on its stick and twirl s-l-o-w-l-y to let any excess drip off. For my girls this step took approximately 2 seconds all in. With the orange lumpy stuff I found that you can actually smooth it on with a spoon, and I'm sure if you could be bothered you could smooth it off again with a palette knife. Actually we quite liked the 'edginess' it gave us.
12. Decorating. We tried 2 methods here; the dip and twirl or the sprinkle. I'm sure the experts have the dip and twirl method down pat, but our efforts generally lead to more chocolate in the bowl of decorations than left on the cake pop, and clumps of decorations in the bowl which then didn't look quite so pretty. Sprinkling is the way to go, if you are really sure you don't mind your entire kitchen floor becoming a trip hazard.
12. Ta-dah! Lick out all the melted chocolate and decorations bowls and make sure you eat every last cake crumb. Pop the finished articles back in the fridge for a tad more chilling and then label and deliver as Gourmet Cake Pops, or scoff the lot yourselves. What could be easier?!
For the observant amongst you, yes there were two steps numbered 12. I just don't like 13 much.
Follow my blog with Bloglovin


